The Equipment Behind Erasing Ink
Published on: January 2, 2026 | Last Updated: January 2, 2026
Written By: Ashita no Joe
Ever walked into a tattoo removal clinic and wondered what all that machinery actually does? I’ve been in your shoes, both as an artist and a client, and I know how intimidating that room of high-tech gear can feel.
This guide will walk you through every piece of equipment you’ll encounter, from the chair you sit in to the laser that breaks down your ink. We’ll cover the specific lasers used for different ink colors, the purpose of the specialized treatment bed, and the essential safety and comfort tools that protect your skin during the process. Knowing what each machine does will transform that uncertainty into confidence for your removal journey.
Essential Tattoo Removal Equipment Checklist
Running a safe and effective clinic requires a specific set of tools. Every piece of equipment in this checklist serves a critical function, and skipping any item compromises both safety and results. This is the core setup I rely on in my own practice.
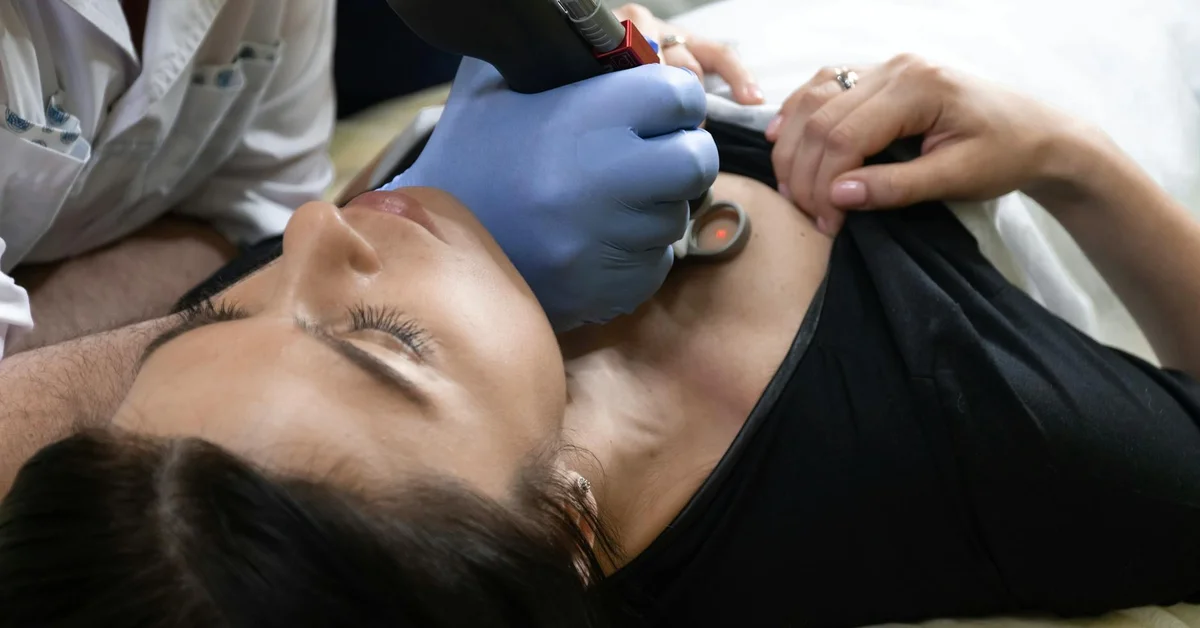
- Lasers: The primary workhorse. These machines generate the specific light energy needed to shatter tattoo ink particles trapped in the skin.
- Treatment Beds: More than just a place to lie down, these specialized beds are adjustable and sturdy, ensuring proper patient positioning for precise laser application and operator comfort.
- Cooling Systems: Absolutely non-negotiable. These systems, often using cryogen sprays or chilled air, protect the top layer of skin from thermal damage and drastically reduce pain during the procedure.
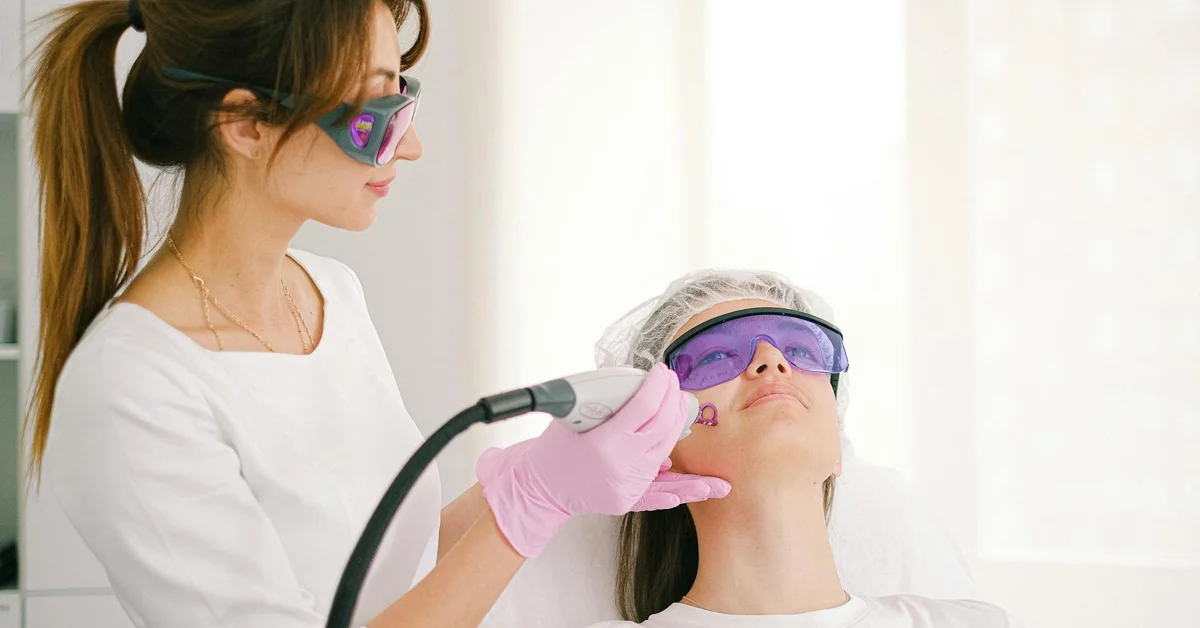
- Safety Gear: This includes certified laser safety eyewear for everyone in the room and high-quality surgical masks. Protecting vision from stray laser light is a zero-compromise rule.
- Disposables: Single-use items like probe covers, sterilization wipes, and patient drapes. Maintaining a strict disposable protocol is your first line of defense against cross-contamination and infection.
Tattoo Removal Laser Machines
Not all lasers are created equal. Choosing the right laser type is the single most important technical decision you will make, directly impacting how efficiently you can clear different ink colors. I’ve worked with all of these over my career.
- Q-switched Nd:YAG Laser: This is the industry workhorse, especially the 1064 nm wavelength. It’s exceptionally effective on black and dark blue inks. Its longer wavelength penetrates deeper, making it ideal for darker skin tones.
- Picosecond Laser: The newer generation. It delivers energy in trillionths of a second, shattering ink into finer particles than traditional lasers. This ultra-short pulse often leads to faster clearance, especially on stubborn inks and some colors.
- Alexandrite Laser (755 nm): This laser is a champion for targeting green ink, which other wavelengths often struggle with. It’s also very effective on blue and black pigments.
- Ruby Laser (694 nm): One of the original tattoo removal lasers. It works well on black, blue, and green inks but is less commonly used today due to a higher risk of skin lightening, especially on darker skin.
How Laser Technology Works on Tattoos
The process is a masterpiece of physics applied to biology. The laser emits a specific wavelength of light that passes harmlessly through the skin until it is absorbed by the tattoo ink particle. Think of it like a key fitting a specific lock. In the tattoo removal process explained, we’ll break down how this works step by step. We’ll also see how different inks respond to different wavelengths and how the body’s immune system clears the fragments.
This rapid absorption creates a photoacoustic and photothermal effect-a mini shockwave and intense heat-that literally shatters the ink into tiny fragments. Your body’s immune system, specifically your white blood cells, then recognizes these tiny particles as foreign debris and slowly carries them away to your lymphatic system. The pulse duration, or how long the laser energy is delivered, is critical. Ultra-short pulses confine the energy to the ink particle, minimizing collateral damage to the surrounding skin tissue.
Q-Switched vs Picosecond Lasers
This is the modern debate in removal technology. The core difference lies in the speed of the light pulse; picosecond lasers are significantly faster than q-switched models. This speed translates directly to treatment efficiency. This raises the question of the best laser for tattoo removal: pico vs q-switched lasers. In practice, many weigh speed, safety, and pigment response to decide.
- Speed and Efficiency: Picosecond lasers generally require fewer treatment sessions to achieve significant fading. The finer particles they create are easier for your body to eliminate.
- Typical Uses: Q-switched lasers are the proven, reliable standard for most black and blue tattoos. Picosecond lasers are often the better choice for stubborn, professional-grade inks and for tackling a wider spectrum of colors, including reds and yellows.
- Stubborn and Multi-Colored Tattoos: For complex, multi-colored tattoos, a clinic will often need both technologies. I find a picosecond laser provides a distinct advantage on difficult-to-remove colors like turquoise, violet, and bright red.
Clinic Furniture and Patient Setup
Every tattoo removal clinic’s foundation is its furniture, designed for precision and patient stability. An adjustable tattoo removal bed is not a luxury; it’s the primary tool for accessing difficult angles on the body. I’ve treated tattoos in the webbing between fingers and along the spine – without a bed that articulates, those sessions would be nearly impossible. Even with noninvasive tattoo removal techniques like laser-based methods, precise access is essential for even, thorough results. The bed is more than support; it’s a platform that helps deliver those techniques safely across challenging contours.
Choosing the Right Treatment Surface
Your comfort and the technician’s access are paramount during a procedure that can last over an hour. We prioritize three key factors:
- Comfort: Well-padded surfaces prevent numbness and allow you to remain still.
- Durability: Furniture must withstand constant cleaning and adjustments without degrading.
- Hygiene: Non-porous, seamless materials are mandatory for infection control.
Most professional treatment couches use medical-grade vinyl upholstery over a steel frame. This specific vinyl is tough enough to resist tears from rings or zippers and can be wiped down with hospital-grade disinfectants between every client. Stainless steel components on the base and levers are common for their corrosion resistance.
Cooling and Comfort Systems
Managing the intense sensation of laser pulses is a critical part of the process. Clinics use several methods, often in combination, to make the experience tolerable. Effective cooling does more than just ease discomfort; it protects the upper layers of your skin from thermal damage, leading to better healing. In the aftercare guide for laser sessions, you’ll learn what to expect in the first 24–48 hours. Sticking to those guidelines helps optimize healing and keep your skin on track.
- Cryogen Spray: A device integrated with the laser fires a precise burst of cold refrigerant onto the skin milliseconds before the laser pulse. This chills the epidermis instantly.
- Cooling Gel: A thick, clear gel is applied to the skin before treatment. It acts as a coupling agent and provides a continuous cooling effect.
- Contact Cooling: A chilled sapphire tip on the laser handpiece directly contacts and cools the skin as the laser fires.
- Forced-Air Cooling: A small hose blows extremely cold air across the treatment area, numbing the surface.
Applying a cooling agent follows a strict sequence. First, we clean and dry the skin thoroughly. For gels, we apply a generous, even layer. With cryogen or air, the timing is automated with the laser. The goal is to keep the skin as numb as possible without causing frostbite, a balance that requires constant observation.
Maximizing Patient Comfort
Beyond machine-based cooling, topical anesthetics play a huge role. I always recommend a strong numbing cream for larger pieces or sensitive areas. For the cream to be effective, you must apply a thick layer and cover it with a cling film dressing at least 60-90 minutes before your appointment. Wiping it off right before we begin leaves the skin profoundly numb, often making the first several minutes of laser treatment barely noticeable. In our best numbing creams for laser tattoo removal guide, we compare top options, their onset times, and safety considerations. This helps you choose the right cream for your piece and skin sensitivity.
Safety and Sterilization Equipment
In my clinic, safety protocols are non-negotiable. The laser is a class 4 medical device, and we treat every session like a minor surgical procedure. Proper safety gear is the simplest way to prevent avoidable injuries to both the client and the practitioner. These principles extend to tattoo removal clinics, where laser safety protocols cover eye protection for everyone, controlled beam paths, and pre-session equipment checks. These measures minimize risk and help ensure consistent, safe outcomes for every client.
- Laser Safety Goggles: Everyone in the treatment room must wear appropriate eyewear rated for the specific laser wavelength. Your eyes are irreplaceable.
- Medical Gloves: Nitrile gloves are worn by the technician and changed between clients and different tasks.
- Sterilization Autoclave: This pressurized steam oven is the gold standard for sterilizing any metal tool or accessory that touches the skin.
- Surface Disinfectants: We use EPA-registered, tuberculocidal wipes and sprays to clean all surfaces between clients.
Sterilization Best Practices
Sterility goes beyond just wiping down a bed. We use a multi-barrier approach. Any item that cannot be autoclaved, like the laser handpiece itself, is covered with a single-use, sterile plastic barrier. We open sterile gauze packs to clean the skin and use sterile drapes to isolate the treatment area from non-sterile surroundings.
After the session, all single-use items-gloves, gauze, barriers, tips-go directly into a biohazard sharps container or red bag. Contaminated waste is never handled without gloves and is disposed of according to strict medical regulations. This rigorous process ensures your safety and is something I would never compromise on, for my clients or for myself.
Disposable Supplies and Consumables
Every removal session uses a set of single-use items to protect you and the technician. These disposables are non-negotiable for a sterile, professional environment and directly impact your healing process. I’ve seen infections from corners being cut, and it’s never worth the risk.
- Nitrile Gloves: These create a vital barrier against bloodborne pathogens and cross-contamination. We change them multiple times per session, especially after handling equipment or cleaning the skin.
- Antiseptic Wipes: Usually containing chlorhexidine or isopropyl alcohol, these thoroughly degrease and disinfect the tattoo area before the laser fires. A clean canvas prevents bacteria from being driven into the skin.
- Sterile Gauze: We use gauze to gently pat the skin dry after cleansing and to absorb any minuscule spotting post-treatment. It’s soft, non-abrasive, and individually packaged to maintain sterility.
Used supplies are treated as regulated medical waste. All soiled items like gauze and gloves go directly into a dedicated, red biohazard sharps container for professional incineration. This system is mandatory and non-negotiable for clinic safety and legal compliance.
Managing Clinic Inventory
Running out of gloves mid-procedure is a nightmare scenario we actively avoid. A simple first-in, first-out (FIFO) system prevents supplies from expiring on the shelf and ensures you always have what you need. I organize my stockroom with new boxes behind older ones.
- Order in bulk from medical suppliers for significant cost savings on high-volume items like gloves and gauze.
- Maintain a “par level” for each item-a minimum quantity that triggers a reorder before you run out.
- Never compromise quality for price. Generic antiseptic wipes can sometimes be less effective than trusted brands.
Cost and Acquisition of Tattoo Removal Equipment
The heart of any clinic is its laser, and the prices reflect that. A new, high-quality Q-switched laser system typically starts around $40,000 and can easily exceed $100,000 for top-tier models with multiple wavelengths. The treatment bed is another major investment, with professional hydraulic tables costing $2,500 to $5,000. These upfront costs are central to a tattoo removal cost-benefit analysis, which weighs upfront investment against expected treatment revenue and patient volume. By projecting cure rates and maintenance costs, clinics can estimate payback and long-term profitability.
Refurbished lasers from reputable dealers offer a solid middle ground. You can acquire a reliable, reconditioned machine for $15,000 to $30,000, but always insist on a full service history and a solid warranty. I started with a refurbished model and it served me well for years.
Some companies now offer laser rental or lease-to-own programs. This can be a fantastic way for a new practice to manage cash flow, though the long-term cost is usually higher than an outright purchase.
Budgeting for a Tattoo Removal Clinic
Beyond the laser, your startup budget must account for everything. Here is a rough breakdown for a basic, professional setup, not including facility build-out or business licensing. Many startups wonder, “how many laser sessions will I need?” A detailed guide can outline typical session counts, intervals, and costs to help you budget accurately.
- Laser System (Refurbished): $20,000 – $30,000
- Treatment Bed & Patient Chair: $4,000 – $7,000
- Consumables (Initial Bulk Order): $1,000 – $2,000
- Ancillary Equipment (Cryo Cooler, Smoke Evacuator): $3,000 – $5,000
Laser pricing is heavily influenced by its capabilities. Machines that offer 1064nm, 532nm, and 694nm wavelengths will cost more than a single-wavelength device, but they give you the versatility to treat virtually any tattoo color effectively. Features like integrated skin cooling and larger spot sizes also increase the price but improve treatment outcomes and comfort. In a laser tattoo removal cost guide, you’ll see how these factors affect price across clinics. This helps you budget and compare quotes for your treatment.
Frequently Asked Questions
How much does a tattoo removal machine cost?
The price of a tattoo removal machine depends on its type and features; new Q-switched or picosecond laser systems typically start around $40,000 and can exceed $100,000, while reliable refurbished models are available from $15,000 to $30,000, with costs influenced by wavelengths and integrated cooling systems.
Where can I purchase tattoo removal equipment?
Tattoo removal equipment is sold through specialized medical device manufacturers, authorized distributors, and reputable refurbished equipment dealers who often provide warranties, service support, and verified machine histories to ensure quality and safety for clinic use.
Is tattoo removal equipment available for rental?
Yes, some suppliers offer rental or lease-to-own programs for tattoo removal lasers, allowing clinics to access advanced technology without a large upfront investment, though it’s important to compare terms as long-term rental costs may be higher than purchasing outright.
Closing Words
The machinery in a professional clinic, from the specialized treatment beds to the high-powered lasers, is designed for one purpose: safe and effective pigment breakdown. This isn’t equipment you can replicate at home, and the skill of the technician operating it is just as vital as the technology itself.
Your safest path forward is to trust a certified professional in a clinical setting. They have the training and the proper tools to guide you through the process, minimizing risks and maximizing your results. Common professionals who perform tattoo removal include board-certified dermatologists, licensed laser technicians, and specialists trained in pigment removal. These practitioners assess your skin, select the right device and settings, and guide you through safe aftercare. Investing in professional removal is an investment in your skin’s health and your own peace of mind.
Further Reading & Sources
Ink Fade Lab is your trusted source for tattoo removal insights, combining expert knowledge with compassionate care to help you make informed decisions about your tattoo journey. Based on years of experience in the tattoo removal industry, we are dedicated to providing accurate, up-to-date information to support your choices.
Professional Laser Machines