The Process of Removing a Fresh Tattoo
Published on: December 28, 2025 | Last Updated: December 28, 2025
Written By: Ashita no Joe
Did you walk out of the tattoo shop with immediate regret? That sinking feeling is something I know personally, both from my own skin and from countless clients in my chair. You are not alone, and more importantly, your situation is not hopeless.
This guide walks you through the realistic steps and professional options available. We will cover the critical timing for starting removal, the methods that actually work, the risks of DIY attempts, and what you can realistically expect for your final results.
Why You Can’t Rush Tattoo Removal
I’ve seen the desperation in clients’ eyes. They want a fresh mistake gone yesterday. But your skin is not a whiteboard. Attempting to remove a tattoo before it has fully stabilized is like trying to clean a painting that’s still wet-you’ll just make a bigger mess. The ink needs time to settle into the dermis, the skin’s second layer.
Your body treats a new tattoo as a wound. It sends immune cells to the area, which encapsulate the ink particles. This process takes months. If you attack the area with a laser before this encapsulation is complete, the laser energy scatters. It fails to shatter the ink effectively and instead causes excessive trauma to the surrounding skin. In tattoo removal clinics, laser safety protocols ensure treatments are timed with healing and that proper eye and skin protection is used. Technicians assess healing progress and adjust energy and cooling accordingly to minimize trauma and maximize safety.
Rushing the process guarantees two outcomes: poor results and a higher risk of side effects. You are far more likely to experience blistering, hypopigmentation (white spots), hyperpigmentation (dark spots), and textural scarring. Patience is not just a virtue in tattoo removal; it is the single most critical factor for a clean, successful outcome. The tattoo removal process explained by professionals emphasizes staged sessions over weeks or months. Understanding this process helps set realistic expectations and highlights why patience matters between treatments. I learned this the hard way with a small tattoo on my own wrist, and the faint shadow of a scar remains as a permanent reminder.
The Dangers of DIY on a Fresh Tattoo
I cannot stress this enough. Do not put salt, acid, or any other corrosive substance on a healing tattoo. Do not attempt to scratch or abrade it off. These methods do not remove tattoo ink; they remove layers of your skin, leading to severe infection and permanent, textured scarring. The damage you can inflict in a moment of panic will take years and thousands of dollars to correct, if it can be corrected at all. If you’re tempted by home remedies like salt tattoo removal risks, remember they won’t remove ink and can cause greater harm. Seek professional tattoo removal instead.
The Critical Waiting Period: How Long is Long Enough?
This is the most common question I get in my studio. The universal rule of thumb, backed by every reputable removal technician and dermatologist I know, is a minimum of six to eight weeks. You must wait until the tattoo looks and feels like the rest of your skin—no shine, no flaking, no raised texture. The healing you see on the surface is only part of the story. Removal happens in stages: after each session the ink fades and the skin enters a recovery period before the next treatment. Understanding these stages helps set expectations for progress.
Beneath the surface, your skin is still rebuilding collagen and organizing the ink particles. Hitting it with a laser before this cellular reconstruction is complete is counterproductive. The inflammation from removal will interfere with the initial healing, creating a cycle of damage.
Signs Your Tattoo is Ready for Removal
- The skin is completely smooth to the touch, with no raised lines.
- All surface-level scabbing and flaking has ceased for several weeks.
- The tattoo has lost its waxy or shiny appearance.
- The colors have settled and no longer look milky or cloudy.
- There is zero tenderness, redness, or itching in the area.
For some people with slower healing skin or more complex tattoos, I recommend waiting three to four months. A longer wait never hurts the removal process, but a shorter one almost always does. Use this time to research qualified removal specialists, not to search for dangerous shortcuts. This waiting period is part of the journey toward complete tattoo removal. Stay patient, and your careful preparation can help you reach the journey’s end with the best possible results.
| Tattoo Stage | Recommended Action | Rationale |
|---|---|---|
| Weeks 1-3 (Active Healing) | Absolutely no removal attempts. Focus on proper aftercare. | The skin barrier is broken and vulnerable to infection. Ink is not settled. |
| Weeks 4-8 (Settling Phase) | Continue waiting. Schedule a consultation with a removal expert. | The dermis is still reorganizing. Laser treatment now is inefficient and harsh. |
| Week 8+ (Fully Healed) | Proceed with professional laser removal if the skin is smooth and settled. | The ink is encapsulated, and the skin is stable, allowing for effective, safe treatment. |
Your First Step: The Professional Consultation
Before any laser fires, you sit down with a professional. This isn’t a sales pitch; it’s a medical-grade assessment. I require this for every single client who walks into my studio. This initial conversation is where we build your entire removal roadmap and set realistic expectations for the journey ahead.
During your consultation, expect a thorough evaluation. We are not just looking at the tattoo’s design.
- We analyze your skin type, its tone, and its overall health.
- We assess the tattoo’s age, the depth of the ink, and the colors used.
- We discuss your full medical history and any medications you take.
- We take high-resolution photographs for your file to track progress.
I also use this time to show clients before-and-after photos of work I’ve done on similar tattoos. Be wary of any clinic that skips this step. A proper consultation is your first and best defense against poor results and potential complications. It’s where trust is built. For those researching options, a quick guide to finding reputable laser tattoo removal clinics near you can help you compare credentials and safety standards. Look for clinics that publish clear consent forms, certifications, and transparent post-treatment care.
Understanding Laser Tattoo Removal Technology
People often think a laser is just a fancy, powerful light. It’s more like a microscopic, intelligent missile system. The laser emits a specific wavelength of light that passes harmlessly through your skin. This light energy is designed to target only the tattoo pigment.
The pigment particles absorb the light energy, which shatters them into tiny fragments. Your body’s immune system then recognizes these tiny foreign particles and flushes them out naturally over time. The laser’s precision is what makes modern removal effective, breaking down ink without significantly scarring the surrounding skin.
Different ink colors require different tools. Think of it like a key and lock.
- Q-switched Nd:YAG Lasers: My workhorse for darker inks-blacks, blues, dark greens. This laser is exceptionally effective on a wide range of skin tones.
- Q-switched Alexandrite Lasers: Fantastic for targeting a broader range of colors, including greens and blues, but I use it more cautiously on darker skin.
- Picosecond Lasers: A newer technology that delivers energy in trillionths-of-a-second pulses. I find them excellent for stubborn, multi-colored tattoos, as they can shatter ink more efficiently.
From my own experience removing a colorful sleeve, no single laser is a magic wand. Effective removal often involves a strategic combination of these technologies, tailored to the specific colors in your skin.
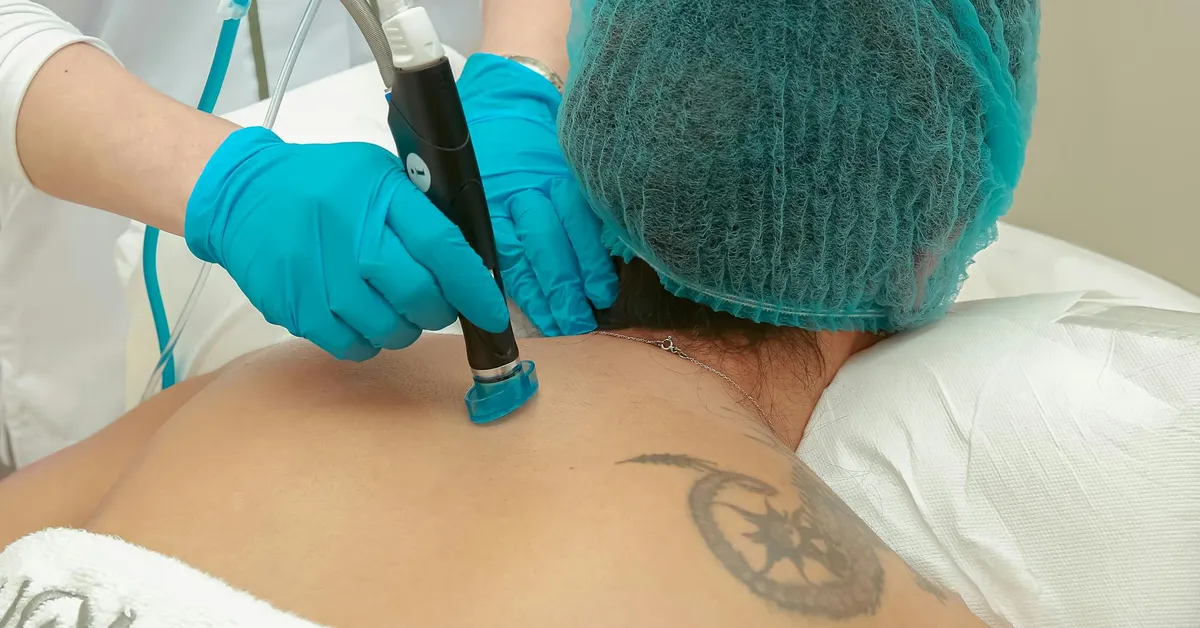
The Removal Session: What to Expect from Start to Finish
Knowing what happens during the appointment calms nerves. I walk every new client through this process. The entire session is surprisingly quick, often lasting only a few minutes for a small tattoo.
- Preparation and Protection: We clean the area thoroughly. You will be given laser-safe protective eyewear. I wear them too. There are no exceptions to this rule.
- The Test Spot: For a first-time session, I often perform a small test patch. We check your skin’s reaction before proceeding with the full treatment. This is a standard safety practice.
- The Sensation: Most people describe the feeling as similar to hot bacon grease splattering on your skin. It’s a sharp, snapping sensation. The discomfort is intense but very brief with each pulse.
- Immediate Aftermath: The area will immediately turn white and swell slightly (frosting). You might see some pinpoint bleeding. This is a normal, expected inflammatory response and usually subsides within an hour.
- Post-Procedure Care: I apply a soothing ointment and a sterile bandage. I then give you a printed sheet of aftercare instructions. Following these to the letter is non-negotiable for good healing.
The laser does its work in seconds, but the real magic happens in the weeks that follow as your body clears the ink. Your commitment to proper aftercare is just as critical to your final result as the laser technology itself. I’ve seen perfect laser work ruined by poor healing, and it’s a frustrating thing to witness.
Navigating the Healing Process and Downtime
Immediately after a removal session, your skin will react. It’s a controlled injury. I’ve seen my own skin puff up like a baked potato, turning red and tender to the touch. This is a normal, healthy inflammatory response as your body starts to process the shattered ink particles.
The first 24-48 hours are critical for managing swelling and discomfort. You might notice tiny white blisters forming. Do not panic. This is common. Your body is creating a protective fluid barrier over the treated area. Let them be. Popping them invites infection and can lead to scarring.
Here is a typical timeline of what to expect:
- Day 1-3: Redness, swelling, and tenderness are at their peak. The area may feel like a sunburn. Blisters often appear.
- Day 4-7: Swelling decreases. Blisters will naturally dry out and crust over. Itching begins-a sign of healing.
- Week 2-4: The top layer of skin sheds. The treated area may look lighter or darker temporarily. The real fading happens deep below over the next 6-8 weeks.
Plan for real downtime. You cannot submerge the area in water, sweat heavily, or expose it to direct sun for at least the first week. I schedule my clients’ sessions so they aren’t interfering with vacations or intense workout regimens. Your body needs energy to heal.
Non-Negotiable Aftercare for Optimal Results
Aftercare is not a suggestion; it’s the backbone of your success. I tell every single client that the laser does 50% of the work. Their aftercare routine completes the other 50%. Poor care can derail your entire progress. In our aftercare guide for laser sessions, expect clear instructions, timelines, and what to avoid. Following them closely helps maximize results and minimize downtime.
Your post-care kit should be simple and sterile. I keep mine stocked with sterile gauze, medical tape, and a thin layer of ointment like Aquaphor. Avoid thick, petroleum-based products that suffocate the skin.
Follow these steps religiously:
- Gently Clean: Wash the area 2-3 times daily with a mild, fragrance-free soap and pat it completely dry with a clean paper towel.
- Protect & Moisturize: Apply the thinnest possible layer of recommended ointment to keep the area supple and prevent scabs from cracking.
- Leave It Alone: Do not pick, scratch, or rub the healing skin. Let blisters and scabs fall off naturally.
- Become a Sun Hermit: Keep the area completely out of the sun. Once healed, apply a high-SPF, zinc-based sunscreen every single day. Sun exposure darkens pigment and stalls removal.
I have seen perfect laser treatments ruined by a weekend at the beach two weeks later. Sun protection is a long-term commitment that lasts the entire removal journey and beyond.
Planning Your Complete Removal Journey
Tattoo removal is a marathon, not a sprint. You cannot rush biology. Your immune system needs time to flush out the fragmented ink particles between sessions. Scheduling appointments too close together is a waste of money and increases scarring risk. If minimizing discomfort is a priority, there are painless tattoo removal options to consider. Modern lasers with cooling systems and topical anesthetics can make sessions more comfortable.
The standard waiting period is 8-12 weeks between sessions. I personally wait a full 12 weeks for my own treatments. This longer break allows for maximum fading and gives my skin ample time to recover fully, which ultimately leads to fewer total sessions.
Realistic expectations are your best friend when it comes to tattoo removal. You will not see the tattoo vanish after one or two sessions. The fading is gradual. We typically see significant lightening after 3-5 sessions, with complete clearance often requiring 8-12 or more for older, denser tattoos.
Consider these factors when planning:
- Your Health: A strong immune system, good hydration, and a healthy lifestyle can improve clearance rates.
- Tattoo Variables: Ink density, colors used, and placement on the body all dictate the number of sessions needed.
- Financial & Time Investment: This is a long-term financial and personal commitment. Plan your budget and calendar accordingly.
Patience is not just a virtue in this process; it is the mechanism of success. Trust the timeline, follow the aftercare, and your skin will reward you with the clean slate you’re working towards.
Frequently Asked Questions
Can I see photos of the tattoo removal process?
Many clinics provide before-and-after galleries or day-by-day photos to illustrate the gradual fading and healing stages, helping you visualize realistic outcomes and track progress over multiple sessions.
What do people share about tattoo removal on Reddit?
On Reddit communities like r/TattooRemoval, users often share personal experiences, progress photos, and tips, but remember that individual results vary and professional consultation is essential for accurate advice.
How much does the tattoo removal process typically cost?
Costs vary based on tattoo size, ink colors, and clinic location, with individual sessions ranging from $200 to $500 or more, and full removal often requiring multiple sessions for a total of $1,000 to $5,000+.
Closing Words
When dealing with a new tattoo you regret, your best move is swift, professional consultation. Time is your greatest asset, and a qualified expert is your most powerful tool. Trying to rush the process with unproven methods will only complicate your situation. If you’re planning to remove it soon, arrange a consultation with a licensed professional to review safe removal options. A prompt assessment can clarify timelines, costs, and the most effective approach for your tattoo.
Modern laser technology offers a reliable path forward, but it demands patience. Your skin needs time to heal from the initial trauma before it can begin the removal journey. Trust the process, follow your technician’s guidance, and you can successfully clear the canvas.
Further Reading & Sources
Ink Fade Lab is your trusted source for tattoo removal insights, combining expert knowledge with compassionate care to help you make informed decisions about your tattoo journey. Based on years of experience in the tattoo removal industry, we are dedicated to providing accurate, up-to-date information to support your choices.
Laser Tattoo Removal